Friday, March 23, 2012

Casa Romantica & Utterly Engaged ~ Part I!

Erica from Twin Events and I collaborated on a spring time photo shoot for Utterly Engaged which was featured this week in their March 2012 "Colours of Spring" issue. It was an honor to be part of such a gorgeous publication and we had a lot of fun putting this shoot together!! There were so so many wonderful photos taken by the incredible Lane Dittoe that I'm going to cover the shoot in a three part blog post, so be sure to visit again next week for the second installment. 

The idea behind the shoot was a different take on bridal showers. Along with dinner overlooking the ocean and a flower bar to create meaningful arrangements for the bride to be, we included a spa day with some cake and cocktails! The photos in Part I are from the "spa" session. The shoot took place at the beautiful Casa Romantica in San Clemente, CA and we had the girls relax in the Griffin Family Fireside Patio.


We went with a jewel toned color scheme of dark pinks and purples. I found gorgeous double petaled anenomes at market along with sweet peas, hyacinth, pieris, phaleanopsis orchids, and these awesome variegated purple hydrangeas. 


I love decorating cakes and I definitely had a field day with this one. I wanted to cover the gold foil plate the cake was placed on and once I started I had a difficult time stopping. Ha! Along with some of the flowers mentioned above, I included ranunculus and lisisanthus. 


Erica of Twine Events worked with Erica Beukelman of 1011 Makeup to create personalized beauty treatments for the girls to take home with them. Amber Moon of Pitbulls & Posies designed all the paper-goods for the shower and had such a cute theme with "Diamonds on the Inside" that she carried throughout the shoot. 


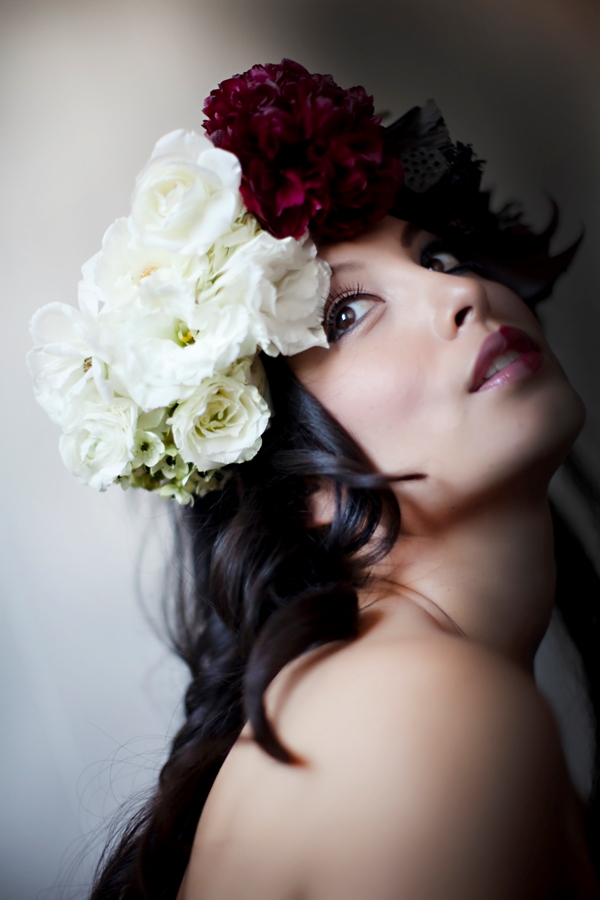
Here are some shots of our gorgeous models for the day. I especially love the bride-to-be's dress, she looks amazing in it. And their hair and make-up were perfect. Erica and her 1011 Makeup team did an fantastic job!


You can view the editorial in Utterly Engaged's newest magazine by clicking this link below. Our feature starts on page 98 but be sure to read the whole issue as it's full of gorgeous springtime beauty!!


Thanks for visiting and look back next Monday as I'll post Part II of this Bridal Shower Shoot! Happy Friday and have a great weekend! 

Cheers! 

Vendor Credits

Photography: Lane Dittoe Fine Art Photography - http://lanedittoe.com/
Venue: Casa Romantica - http://casaromantica.org/
Planner/Stylist: Erica EspaƱa – www.twineevents.com
Stationery: Amber Moon – www.pitbullsandposies.com
Hair & Makeup Artist: Erica Beukelman/1011Makeup – http://1011makeup.com/
Rentals: Signature Party Rentals – http://www.signatureparty.com/
Antique Rentals: Your Rustic Wedding – http://www.yourrusticwedding.com/
Florals & Styling: Nancy Teasley - www.oakandtheowl.com

Friday, March 9, 2012

Headpiece Photo Shoot & Mock-Ups

These photos were taken by my friend, the amazing Kamee, of Kamee June Photography. We collaborated on this for her "Elevate ~ a Fine Art Photography Exploration". Elevate was a fine art project where a selection of professional  photographers from around the country broke out of the box of constantly shooting the same material, and went back to what inspired them to become photographers in the first place. Each month Kamee's post was the best... In my opinion. But honestly, her work never fails to impress me. And she just keeps getting better ~ it's great to be around her constant development as an artist. She's inspiring.

For this entry, Kamee wanted to play with the idea of good and evil, soft and hard, light and dark, etc. - basically a study in contrast. She envisioned a beautiful woman done up with two opposing sides and brought me on to make the floral headpiece and Nicole Deanne for hair and make-up. Kamee's photos are stunning and I think each individual artists contribution came together nicely. The model, Andrea, did a great job of capturing the dichotomous nature of the conflicted woman she was supposed to portray and Nicole's hair and make-up are well, just plain awesome. Some of the details were lost in her hair because there was so much dark working against us, but if you really look, you can see just how cool her teased and crimped hair was. I loved it.


While I was at the DTLA flower mart buying for the headpiece, I decided to get a few more flowers to make some mock-up bouquets for my portfolio. I made two renditions. The first one is a softer, more romantic version that I could see for a wedding around the holiday season. I took these photos with my fancy new Cannon 50mm 1.8 lens that Kamee taught me how to use. I obviously need a few more lessons but I was really happy with how much better the photos turned out then with the stock lens the camera originally came with.


Here's the second version. This one is a little more hard edged and has a bit of a tropical feel with the inclusion of anthurium, calla lilies and brunia berries.. It was an interesting process of seeing how different bouquets can be even when using mostly the same materials.


I wanted to end this post with an exciting announcement that Kamee and I, as well as several other awesome professionals, are working on a photo shoot to end all photo shoots for next weekend... But I just found out there's a 60% chance of THUNDER SHOWERS!! Now that just won't work... Hmmmm. Anyone have a beautiful home in either Newport Beach or Balboa Island that wouldn't mind a mock wedding being set-up on the 17th?  If so, email me!! I know we'll make it work even if I have to shelve some of my ideas for the next shoot. Either way, it will be beautiful and I can't wait to share it in the next few weeks!

Happy Friday and thanks for visiting!!

Friday, March 2, 2012

Before & After ~ Master Bedroom

I can't believe February is over. And I can't believe in my first month of blogging I missed a week! Last week was all about me and my little man, Bass. Sometimes the joy, along with the full throttle aspect of mommy-dom, can make social media seem like an impossible mountain to climb. So last week I didn't climb, I just chilled with my boy. And it was great! 

Another thing I can't believe is that it's going to be Bass's 2nd birthday next Tuesday. What the hell? Where did that time go? My original due date was February 27th. Last Monday I kept dating everything 2/27/10 - because that date will forever be burned into my memory along with the fact that it took him over a week to finally make his appearance, and he didn't make it willingly, lol. So that got me thinking about this weeks blog post and how this time of year I remember everything I did to get ready for baby. I completely designed his room and my master bedroom from scratch and made almost everything by hand. It was a labor of love and I wish I had better pictures of both rooms. I have decent ones of the Master so I wanted to share that project today.

This was my former Master Bedroom. It was amazing... A round room in an old turret in a 1880's Victorian in Oakland, CA. I loved this room, but I had the hardest time designing it so it was functional and pleasant to wake up in. It had been painted a horrible "caution" orange from the previous tenant and was painted horribly at that.  To make the orange liveable I bought jeweled toned bedding from IKEA in dark purple and a reddish orange (totally not my color scheme at all - but I was making do) and I hung jeweled toned drapery over the windows as well as the opening to the room because there wasn't a door to close. Another feature of the turret was that the landlord never finished the ceiling. When I moved in it was covered in this disgusting plastic sheeting, that when I finally removed it, about a million dead lady bugs came pouring down - so GROSS! Before I pulled the sheeting down I thought I would buy some cheap, but decent, fabric and cover it up. Well, the uppermost point of the ceiling was approximately 30' high and there were 2x4's blocking my ability to get all the way up and make the turret look clean and streamlined. The end result was that I felt like I was sleeping under a nuclear smoke cloud ready to explode at any time. Not very restful... (I don't have any pics of the ceiling)

Before
This picture is actually too kind ~ visually speaking. It was taken during a party for which I had done my best to make the room look nice. With the right amount of cocktails, soft candle light and the little changes I made, my friends thought it was lovely. In the sobering daylight... they changed their minds. ;-) I also hung two of my paintings to make the room more bearable - they're in the back flanking either side of the middle window.

After

The first thing I did was get a ladder and tore down all the fabric and plastic covering the ceiling. I was worried about what I would find underneath, but I was pleasantly surprised. It was just the insulation set between 2x4's and since the insulation was covered in a brown paper, just like craft paper, I left it as is - after checking Google to see if the insulation had any qualities that would make it dangerous to keep uncovered.

The second step was to find a warm white to cover up the orange. Just that made a HUGE impact and already the room was more peaceful. 

Third step was to come up with a design for the round bed - yes I know, a round bed in a round room - kind of odd. But it was actually pretty perfect, other than it just floated in the room. There was no headboard, no side tables that would fit, totally frustrating. To deal with this, I designed a rounded headboard that was fixed to the wall. It had two pieces that I upholstered in a great faux white leather, very soft to the touch and on the eyes as it had a slight matte finish to it. Because there were two separate pieces of the headboard, I built shelves behind the 18"H panels to hold books, lamps, flowers, etc. which made the whole piece functional in several aspects, and that is always a positive when designing. I would have liked to have made the headboard longer but the clearance was such, with the curve of the room, that any longer and it would have been impossible to get behind it.


After I tore the fabric down, painted the walls, and installed the headboard, I designed and made all the decorative bedding. Two of the pillows and the window treatments are covered in white silk, which I backed with muslin, and accented them with a black grosgrain ribbon for the pillows and a black & white polka dot ribbon for the roman shades. The two Euro shams are covered in a faux white angora, very soft and fun to lounge on. The lumbar pillow has a combination of the silk and angora with black grosgrain ribbon to separate the fabrics. All in all, I was really happy with the end result as was my sweet Bass. I included some pictures from a photo shoot I did with him when he was 3 months old for his dad's first Father's Day.


I'm sure you already get the point, but Bass was just so cute, I can't help including more photos.


So, that's it for today! I hope you enjoyed reading about my little interiors project and please let me know if you have any questions as I can write a DIY post about what I made so you can make them for yourself. Thanks for visiting and once again, Happy Friday!!